Boosting Shop Productivity by Applying High Efficiency Milling Techniques
 As more and more machine shops are competing for jobs throughout the world in the aerospace, medical, automotive and industrial markets, they need to find better ways of being competitive at the spindle. We all know that the market drives how much we can charge for our components and it’s up to us to increase our profits by finding more efficient ways to go from print to part. In this article we will go over some of the obstacles in milling that could be holding you back, explain what High Efficiency Milling or Machining (HEM) is, how this milling technique can work in your manufacturing facility, and finally identify some machining and tooling scenarios where HEM can boost your productivity make you more competitive.
There are five main, often overlooked, challenges that could be holding you back from employing a true High Efficiency Milling or dynamic milling environment in your shop.
- Traditional Tool Paths
- Old Machine Tools
- Poor Tool Holding
- Improper Part Fixturing
- Underutilized Tooling
Traditional Tool Paths. A traditional tool path is where an endmill is put into unfavorable moves creating undo stress on the tool, machine and material. These tool paths are offsetting tool paths, which means the endmill is only allowed to make 90-degree parallel offsets to get into the next path usually with large radial stepovers. When this happens the endmill will most likely be put into a slotting condition and buried in corners on occasion. Whether you come from the outside of the part or if you are creating a closed pocket, there will always be a slotting condition. Because the tool is put into slotting conditions it is recommended to run at conservative speeds and feeds and low Axial Depths of Cut (ADOC) to protect the tool from premature wear because of heat buildup and vibration of the endmill. This will ultimately give us low metal removal rates and poor tool life.
Machine Tools. The milling machines we use in our shops have a lot to do with the throughput we can get from them when using High Efficiency Milling. Using older inadequate machines can hold us back from using HEM strategies because of the lines of codes it generates, speed it runs, and the accel and deccel rates of the machine. A normal traditional path to make a pocket could consist of 600 lines of code running at 15 inches a minute whereas a HEM strategy programmed with a dynamic path could generate over 20,000 lines of code and run at 200 Inches a minute. This will require much better processing speed, machine rigidity, and better spindles to run most efficient.
Poor Tool Holding. We all want to buy the top of the line CNC mill, coat the floor where the machine goes, buy the best CAM package to program, put your best operator on it, and then run everything with an ER collet system that was purchased on eBay. It is critical to be aware of the tool holder that is in your machine. When running a HEM tool path, you need to be mindful of the one important feature that connects the endmill to the spindle. Runout, or TIR (Total Indicator Reading) of the toolholder is very important to being successful and giving you great tool life, along with part finish. There are several tool holders that are recommended and perform well in HEM. These include but are not limited to precision collet systems, shrink fit, press fit, and hydraulic, along with many others that give you the holding force and recommended minimal runout. I always like to see less than .0003 runout on your holder for starters in HEM to give you the best life. Let’s not forget that as the tool gets smaller and the chip load becomes minimal, the runout becomes even more critical.
Improper Part Fixturing or Workholding. When we look at the material to be machined, whether it be a billet, forging casting, or even an assembly, it is critical to make sure that the fixture, vise or mounting plate is supporting the part adequately. There are several contributing factors to give you the best tool life with some simple fixturing modifications. First make sure that your overhang is always at a minimum. When a material is hung out past a vise or support on a fixture it wants to spring up and down kind of how a diving board does. It has more vibration out at the end versus the part closest to the side of the pool. So, if we can limit the overhang, put jack screws for support, or build a fixture with minimal overhang, we will have a better chance of being successful in HEM. Second make sure your clamps are as close to the part as possible with no interference with the endmill. We want to keep the endmill with the least amount of extension from the holder as possible. If running on a horizontal milling machine with a tombstone, make sure that your vise and fixture are at the lowest point possible to create the strongest and most rigid setup.
Underutilized Tooling. When running traditional tool paths, we really see the reduction in choices of endmills we can use. Because of a heavy radial step over and light Axial Depths of Cuts, we are limited on what flute counts and Lengths of Cuts (LOC) are available for the application. A large radial stepover means we would need to go with fewer flutes on the endmill to create more chip room to evacuate the chip. In most cases, for roughing we would use three or four flutes for ferrous materials, and two flutes for non-ferrous materials. When you go with less flutes, the endmill with have a weaker core making it less strong and stable. Light Axial Depth of Cut (ADOC) means that the endmill will not be able to keep the correct number of flutes engaged in the material at one time creating a slapping effect on the cutting edge. An endmill becomes under load as it enters the material and wants to spring back after the flute exits. By having a Low ADOC and limited flutes, we are not able to keep the tool under load and stabilized.
What is High Efficiency Milling
Now that we know what some of the obstacles are with running a high efficiency tool path, let’s talk about what High Efficiency Milling is and how it works. HEM is a milling technique that helps spread wear of a cutting tool across the cutting edge, dissipate heat and reduce tool failure. There are three “T”s of HEM: Tool Path, Tooling, and Technique.
Tool Path employs intelligent tool paths generated by CAM that strategically manages cutting forces and maximizes productivity. Tooling utilizes smaller endmills with a higher number of flutes (and a heavier, stronger core) running at higher speeds and feeds. Technique involves higher Axial Depth of Cuts (ADOC) and light Radial Depth of Cuts (RDOC), chip thinning, and controlling the angle of engagement.
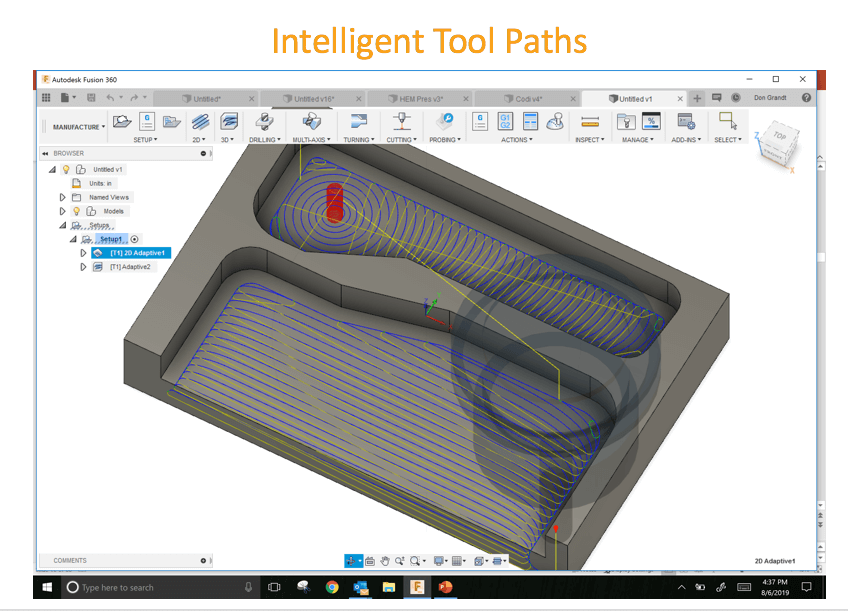
If we look at the Tool Path that was described in the first part of the article, a High Efficiency Milling tool path will eliminate all the variables that put the tool in an undesirable situation. Think of a traditional tool path like driving a car up a mountain road with a bunch of curves. Your car must hit the brakes, slowdown, make the curve, accelerate to climb the hill before doing it all over again. This puts stress and force on the car and ultimately putting extra wear on it, shortening its life. A HEM tool path would make that car think it was driving down a straight road with no curves or hills. HEM tool paths will control the force and undesirable situations on the endmill and make it think it is running straight. It does this by controlling the stepovers, speeds, angle of engagements, and minimum radius the endmill can take in corners. Ultimately giving you great endmill predictability and tool life!
Now let’s look at the Tooling used in High Efficiency Milling strategies. When the tool path is putting our endmill in favorable conditions we can use tools that have smaller diameters with a greater number of flutes. The endmill now can get up to five, six, seven, and greater flute counts because we will be managing the stepovers with light radials and deep axials. When we add flutes on an endmill we create a stronger core in the center ultimately making the tool more rigid and strong. This allows us to handle those greater Axial Depths of Cut (ADOC) with much less deflection. If we can reduce the size of the endmill needed, we can also start reducing the cost of that endmill versus larger diameters.
The Technique is one of the biggest game changers in HEM. We are now going to start taking a much smaller radial stepover and a greater axial step down to create a safer environment for the endmill. When we take a light radial stepover we create something called “Chip Thinning”. Chip thinning happens when you take a radial stepover less than fifty percent of the diameter causing the chip being formed to be less than what you programmed.
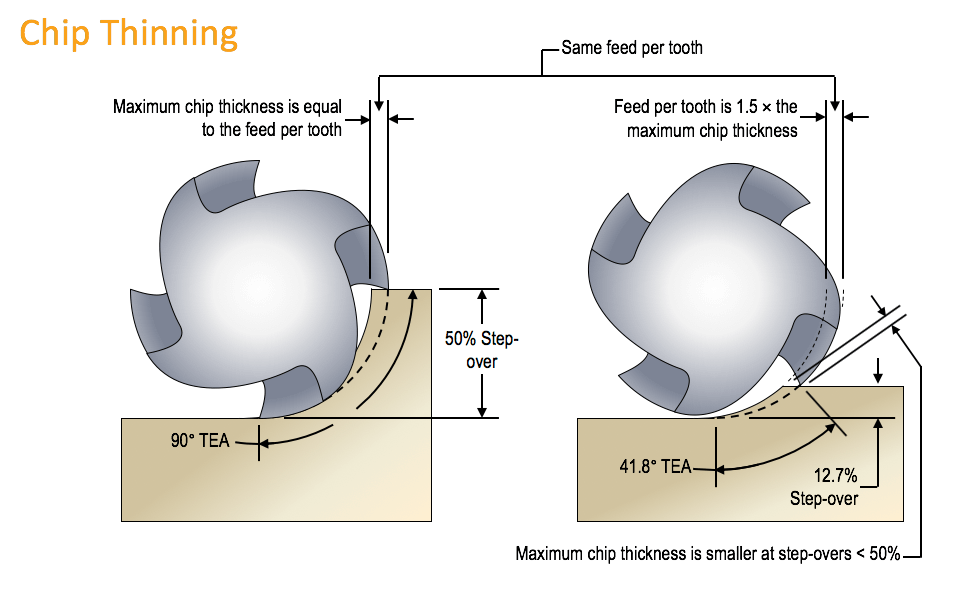
When this happens the only way to get the chip up to the desired thickness is to feed the tool faster creating less tool wear and greater productivity. We are also going to take a greater ADOC utilizing the whole Length of Cut (LOC) on your endmill to help stabilize to tool.
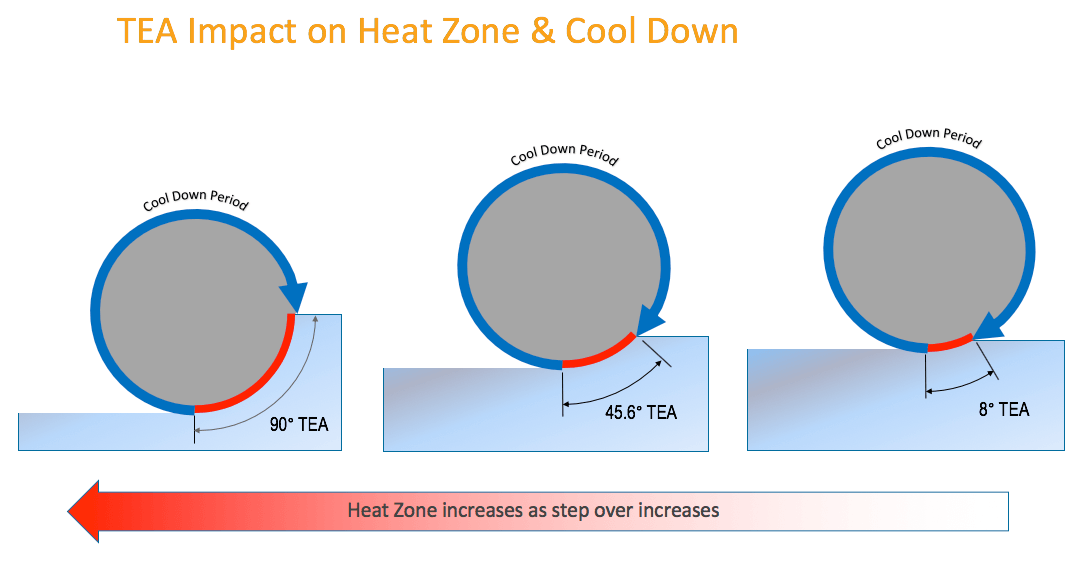
There are two main things that kill an endmill’s life quickly – heat and vibration. HEM strategies do a great job to eliminate these issues. First let’s address the heat that will start deteriorating your endmills life. When an endmills cutting edge passes through material the friction and heat generated will start to breakdown the coating and carbide over time. So, if we can minimize the amount of time the cutting edge is in the material, we can create an environment that minimizes the heat generated that allows the endmill to be in a cooling zone for longer. This is important to remember when you are cutting different grades of ferrous materials along with titanium. As materials get stronger and harder the heat generation will be greater, therefore be mindful of reducing the radial stepover in order to give your tool a better chance to survive. There is a simple analogy to think of for heat generation on a cutting edge. Think of passing your finger through a candle. The less time your finger is in the flame the more you can continue to move through the flame. If you stop on the flame for 2 to 3 seconds, then your finger will get hot and you will have to eventually stop. This is what happens to the cutting edge on a tool. Enough heat will start breaking down the coating and deteriorate the carbide, ultimately causing your tool to fail.
The vibration will be eliminated by extending the ADOC to encompass much, if not all the cutting edge. This will put more than one flute in the cut at a time keeping the load on the endmill stable. When an endmill engages the material it becomes under load, if we do not keep two or more flutes in cut constantly, we will get that slapping effect that we talked about earlier when a cutting edge enters and exits. By stabilizing the cutter and reducing the vibration on the tool we can again get better tool life and greater predictability of the endmill.
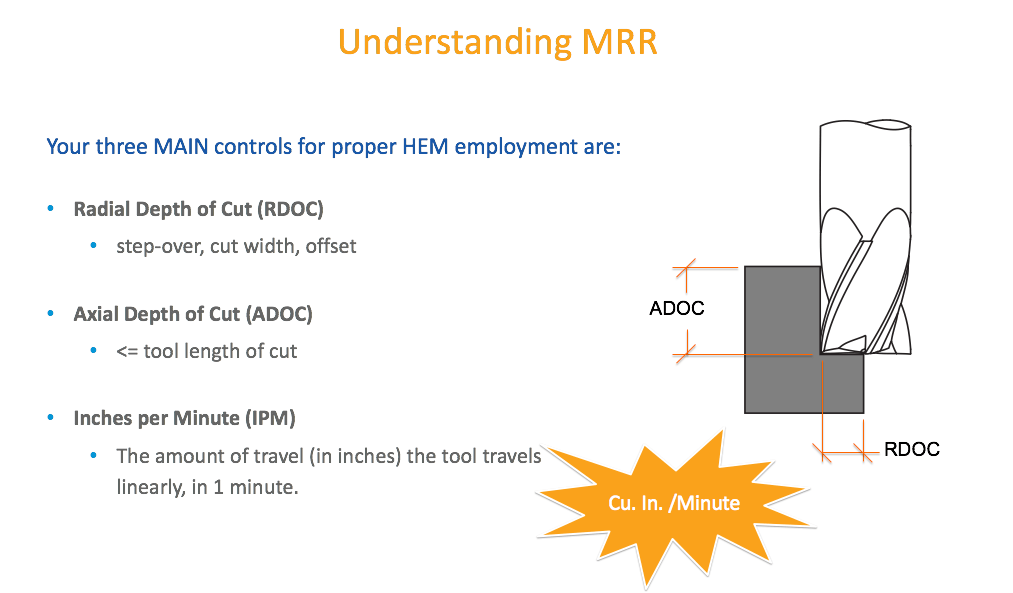
The MRR Triangle
We have all heard of the Bermuda Triangle, along with the Fire Triangle, but what is the MRR Triangle? MRR is an acronym that stands for Material Removal Rate. This is used to figure out how many cubic inches of material you are removing per minute in your milling application. The calculation is quite simple. It is your Axial Depth of Cut (ADOC), times your Radial Depth of Cut (RDOC), times your feed per minute or Feed Rate. Why is this important to know when running HEM? We judge our efficiencies in milling by how quickly we can remove material off our part and not sacrifice tool life. Our greatest material removal rate is going to be with a High Efficiency Milling strategy which employs a light Radial Depth of Cut, high Axial Depth of cut and an aggressive Speed and Feed. So how do we use this in a Triangle? In order to get maximum tool life without sacrificing your MRR rate you have three things to play with: Radial, Axial, and Feed. For example, if my tool life is poor but I am running a good MRR rate, I could adjust anyone of the three factors of MRR to increase tool life and then counteract with another. Say my tool is choking out because my Radial is too aggressive, I would reduce my Radial Depth of Cut, leave my Axial Depth of Cut but because we have extra chip thinning with a lighter radial, I would increase my Feed maintaining my MRR and ultimately making machine rate. (Flute count, helix angles, coatings and substrate also have a lot to do with the tool life).
When It’s Time to Consider HEM
If you work in or own a manufacturing facility that has mills, and you are not applying High Efficiency Milling Techniques to your machining processes, it might be time to start. The unbelievable cycle time reduction along with the added tool life of your endmills will undoubtably put more profits back into your company allowing you to reinvest and stay competitive. I hear a lot of talk about us as a manufacturing community losing some of the old skilled labor force that was the backbone of machining knowledge, and what does the future bring? Well I can tell you the younger generation of Machinists are programming High Efficiency Milling tool paths, and using these techniques with great success. I think the future of machining is bright and we should embrace the change from Traditional Milling to HEM!
Check our Milling Techniques webinar for some great hands-on expert advice and an informative demo on this application.
You can get more information by contacting one of our highly knowledgeable tooling sales reps or support techs orders@productivity.com.
Written by Don Grandt, National Applications Manager for Harvey Performance Company in collaboration with Scott Tiehen